
What is Teams?
Microsoft Teams is a communications platform that allows groups of people to work together on projects or common interests. Features include:
- File creation, storage, and sharing
- Chat
- Videoconferencing
- Application integration.
How to Access and Download Teams
- Go to https://www.office.com/
- Click the Sign in button.
- Enter your Gettysburg Email address and click the Next button.
- If prompted, choose the Work or school account option.
- Enter your Gettysburg password and click the Sign in button.
- Upon logging into Microsoft 365 online, you may or may not see a list of commonly used apps. If you don’t see Teams:
- click the Apps button on the side menu bar

- or click the App Launcher (checkboard icon) in the upper left corner of the window to reveal a list of available applications.
- click the Apps button on the side menu bar

- Choose Teams. Teams will open in the web browser.
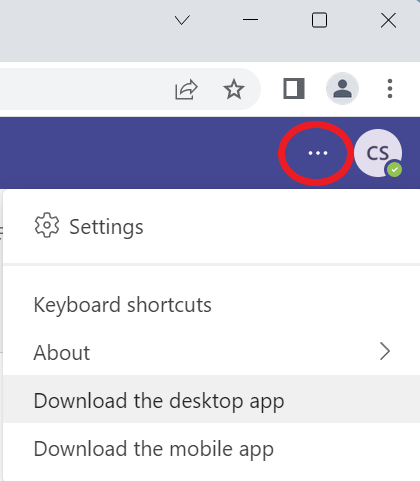
- To download the Teams application to your computer, click the three dots next to your login icon in the upper right corner of the screen and select Download the desktop app.
- Run the installer file. (Most browsers download the file to the Downloads folder on the computer.)
- Open teams from the applications list.
Trouble Installing the “New” version of Teams over the “Classic” version?
In some cases, people may be running the “Classic” version of Teams, which is missing some of the features in the new version. In this case, when you click the “Download the desktop app” from inside your Microsoft 365 account, you may be directed to a Microsoft Teams Download page. Scroll down this page and look for a “Teams for work or School” option.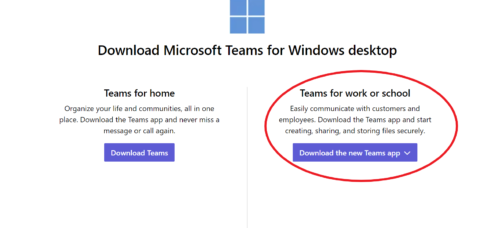
Basic Team Structure
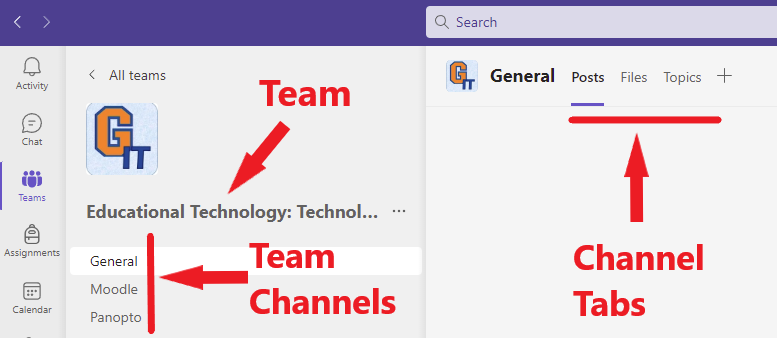
- Teams – Groups of people organized by topic of interest
- Channels – Subtopics within a Team
- Tabs – Ways of organizing information within a Channel
- Channels – Subtopics within a Team
Team Types
There are four types of Educational Teams: Class, Professional Learning Community (PLC), Staff, and Other.
- Other (Recommended choice for most campus teams)
- Professional Learning Community (PLC)
- Staff
- Class
Different Team types come with predefined tabs, such as themed notebooks, assignments, grades, and reflections. While helpful in structuring a class or professional learning community, some of these tabs cannot be deleted and may clutter your site if you don’t intend to use them.
The “Other” Team type has the least number of tabs while the “Class” type provides the most structure, including grade, assignment, and other academic options needed when teaching an online class. (For the most basic structure, IT recommends using the “Other” Team type when making a campus team.)
Differences between Staff and PLC Team Types
Both the Staff and PLC Team types automatically create a OneNote Notebook where members can collaborate.
The Staff Notebook includes private sections that can only be seen by the Team leaders as well as private sections for each Team member that can be used for personal notes and evaluations with the Team leaders.
The PLC Notebook does not include private spaces and is open to everyone in the Team. Adding a channel to a PLC Team automatically creates a new corresponding section in the PLC Notebook.
The Other Team type does not include a OneNote Notebook, although you can add one to the Team if you wish.
Team File Storage
Files uploaded to a Team are accessible to members of the Team. Unlike files shared from an individual’s OneDrive storage, Team files are stored in the Team’s SharePoint folder, which is a separate storage space created when a new Team is created. Uploading to and storing files in a Team ensures that if the person who uploaded the files leaves the college, the files are still accessible to the remaining Team members.
You can access files in a Team by clicking on a channel and selecting the Shared tab.

Using Teams for Online Meetings
Microsoft has integrated the Outlook calendar into Teams, allowing users to schedule and open online meetings within the application. You don’t need to create a specific Team to use the meeting function inside of Teams. Simply open Teams, click the Calendar button, and click the New meeting button. For step by step instructions on creating online meetings using Teams see Scheduling a Meeting Using the Teams Application.
Don’t see the Calendar button in Teams?
If you don’t see the Calendar button in the the menu bar when you open Teams, click the View More Apps button and select Calendar.
Online Teams Training from Microsoft
Microsoft has created a series of free, self-guided online training courses that covers the basics of using the educational version of Teams. See the following three modules for getting started with the application.
- Get Started with Microsoft Teams for Education (self-guided online course)
This is the first module in the Microsoft Teams training track. It includes basic information about setting up a Team and navigating the application. - Enhance school communication and collaboration in Microsoft Teams (self-guided online course)
This module expands upon the information provided in the previous “Get Started” Teams module. It includes information about using channels, managing files, and using the Posts and OneNote features of Teams. - Assemble learners and staff with Microsoft Teams meetings (self-guided online course)
This module covers the Teams online meeting functions and includes information about scheduling an online meeting, meeting settings, sharing content, recording meetings, and using breakout rooms.
Further Microsoft Teams Resources
- Navigate the Teams Space
- Create or Join a Team
- Converse in Teams
- Find, Store, and Share Files in Teams
- Learn more about the differences between Staff and PLC teams in Microsoft Teams (self-guided online course)
- Use Reflect in Staff Teams
- Features of PLC Notebooks Explained
- Features of a Staff Notebook Explained
- Microsoft Learn Education Center
- Microsoft Teams Video Training
